Here at Elite Roofing, in addition to excellent quality and workmanship, we also want to help our customers save money and get the best value from their roof. That means we understand the desire to DIY when it comes to simple home maintenance tasks. After all, it’s hard to beat the value of doing the work yourself! Replacing asphalt shingles is a pretty straightforward task that most homeowners should be able to tackle. That said, it’s not foolproof, and it’s good to have an idea of what pitfalls to avoid before you get started. So today, we’re walking you through the process of replacing asphalt shingles and highlighting the five biggest mistakes to avoid.
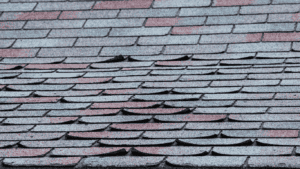
Mistake 1: Ripping or tearing surrounding shingles
The first step in replacing loose or damaged asphalt shingles is to remove the offending shingles. In doing this, it’s important to work carefully and deliberately. If you work too quickly or roughly, you risk making the first major mistake: damaging surrounding shingles. The last thing you want to do in replacing a bad shingle is make the task more difficult!
Mistake 2: Not removing the entire shingle
Rather than working carefully to remove the damaged shingle, it may seem simpler to cut out the shingle to save time. However, this is also a mistake! Failing to remove the entire shingle will make it much more difficult to put a new shingle in its place. The replacement shingle will likely be loose or improperly fastened, leaving your roof vulnerable to water or blown off shingles. You may need to remove nails from surrounding shingles to give yourself enough room, but the extra effort will be worth it in the end.
Mistake 3: Forgetting to seal nail holes
Once you’ve removed the faulty shingle, you’re ready to put a new shingle in its place. Carefully slide the new shingle where the old one was and nail it down. In doing so, take care not to make the third major mistake: forgetting to seal nail holes. Nails will hold your shingle down, but on their own they aren’t watertight. Unsealed nail holes create an entry point for water to penetrate through your roof’s underlayment to the decking below.
Mistake 4: Forgetting to replace nails from surrounding shingles
As mentioned earlier, you may need to remove nails from a few surrounding shingles to give yourself enough room to work with. That’s perfectly fine—as long as you remember to replace those nails later on! Forgetting to replace nails will result in loose shingles on your roof. This leaves room for water to penetrate your roof, and it can even lead to shingles blowing off of your roof in high winds.
Mistake 5: Not sealing your roof’s shingles
Once everything is nailed down, you may think you’re done replacing your roof’s damaged asphalt shingles. But shingles need more than just nails to stay in place, and forgetting to seal new shingles will leave you with loose shingles that can catch in the wind. To avoid this problem, seal your new shingles with shingle mastic (also called roof mastic). Don’t forget to re-seal surrounding shingles as well!
Replacing Asphalt Shingles: An Excellent DIY Roofing Project
At Elite Roofing, we feel every homeowner should have a few DIY tricks up their sleeve. Replacing damaged asphalt shingles is a handy skill to have! It’s a simple DIY repair project that can save you money and extend the life of your roof quite significantly. And of course, if you don’t want to do it yourself, the Elite Roofing team is always standing by with a full slate of residential roofing services. Whether it’s a simple repair or a complete roof replacement, Elite Roofing is the company to call for Roofing Done Right!
For more roofing tips from the Elite team, be sure to keep up with our blog and follow us on our social media channels: Instagram, Twitter, and Facebook.